Install Kali Linux 2020 1 on Virtualbox

Ethical Hacking Complete Course Zero to Expert
Hack like black hat hackers. Penetration testing, Kali Linux, WiFi and web hacking, and the hacker mindset behind it.
→ Take the full courseIn this article and video, I will show you how to install Kali Linux 2020.1 on VirtualBox. Also, install a single boot with Kali Linux. I will cover some big changes that have been made with this new release.
“Kali Linux is an Advanced Penetration Testing Linux distribution used for Penetration Testing, Ethical Hacking and network security assessments.”
Kali Linux 2020.1 Release
On 28 January 2020, Kali has kicked off with the first release of the decade, Kali Linux 2020.1 In this article I will cover the most important changes.
Non-Root
The default credentials have been root/toor. This is no more. Kali Linux is no longer using the superuser account, root as default in Kali 2020.1. The default user account is now a standard, unprivileged, user.
root/toor is dead. Long live kali/kali
Use Kali Linux as your Main OS?
Now you can use Kali Linux as your main OS, but should you? This is up to you. There wasn’t anything really stopping you before, but Kali isn’t encouraging it. They still don’t. Therefore this is only recommended for people who are familiar with Kali enough.
Kali-Undercover
Kali Linux continues with Undercover. Kali-undercover now starts to feel even more like Windows to help blend in.
How to enable the undercover mode in Kali Linux:
| |
Kali Single Installer Image
Kali Linux does not longer offer separate images for every desktop environment (DE). Instead, they have a single image with the option to pick your DE during installation. This means there isn’t a download link for Xfce, GNOME, KDE, MATE or LXDE DEs anymore. Just one image to rule them all.
At the install time, you may select the tools included with Kali (or none at all)! This gives you more control over what you want. Now you can install Kali without any meta-packages, giving a bare Kali installation, you can individually select what tools you want (rather than groups). More Info
Note: “Kali Live” is not included in this image. If you wish to use live mode, you’ll need the live image.
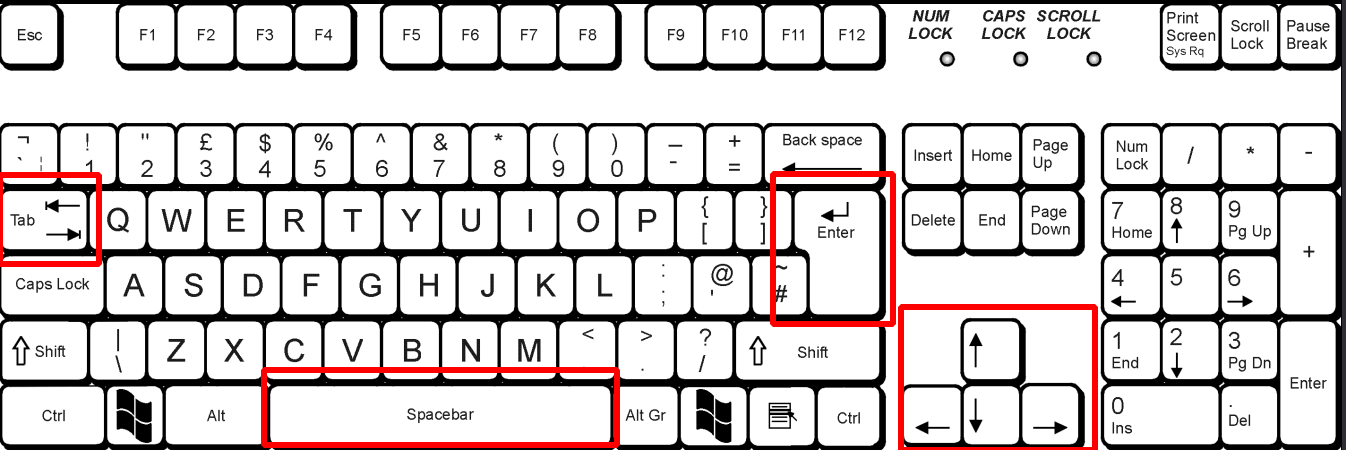
Use the space bar to check the options that you want to choose
Short keyboard explanation for “noobs” beginners ;-)
On the keyboard image below you can see the options that are used with the installation of Kali Linux.
Install Kali Linux
This step-by-step tutorial teaches you to install Kali Linux on VirtualBox.
Download Kali Linux
I would like to make another note. Personally, I always download every ISO from the original OS and certainly NO pre-made ones. Especially when it comes to Kali Linux. This is because of possible vulnerabilities.
First, you have to download the ISO file from the official Kali website. This is because, in this article and video, I choose the Kali Linux 64-Bit (Installer)
Kali Linux Download
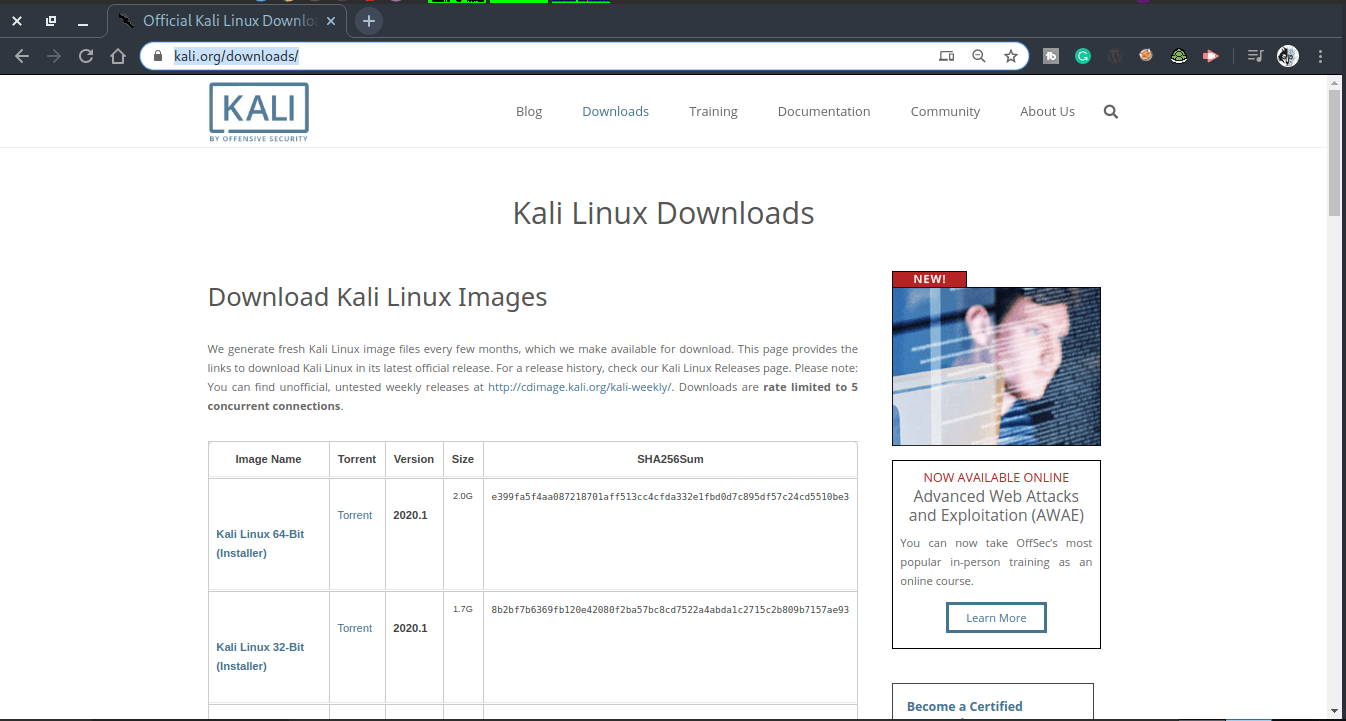
Kali Linux Download
You can download VirtualBox here. How to download and install the VirtualBox on your Linux or Windows, I will cover that soon in a new article.
At the bottom of this article, you can watch a video of the entire Kali Linux installation.
Or click on this link to go to the video on YouTube.
Install Kali on VirtualBox
Now the download is complete, open VirtualBox and click on “New”
This will open a new screen. Give it the name “Kali Linux 2020.1” And choose the type: “Linux” and “Debian”. (Kali Linux = Debian Based). Or whatever you may use. Maybe you even use another Linux distro
After that click on “Next”

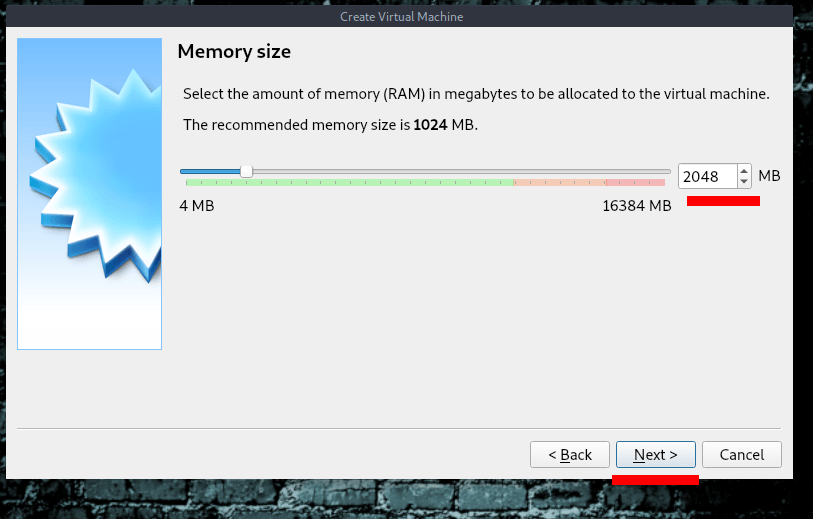
Memory size
Set at least 1 GB of RAM. “If your physical machine is 16 GB of RAM, you can set 4 GB of RAM for a virtual machine to install Kali Linux on VirtualBox.”
Personally I always set the memory size to 2 GB RAM. This is because most (when I run some tests) I have more than one Virtual Machine (VM) open.
After that click on “Next”
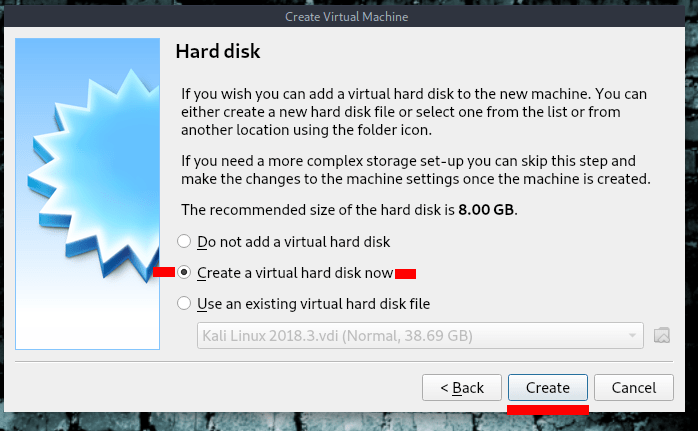
Hard disk
Put it on: “Create a virtual hard disk now”
And click on “Create”
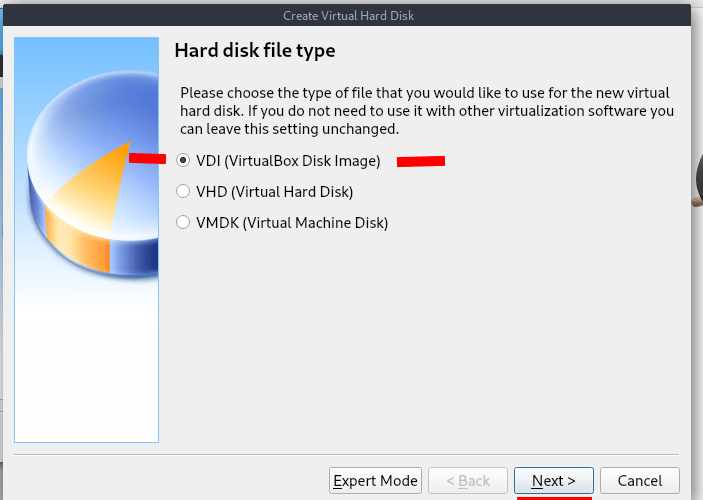
Create virtual hard disk
Click on VDI (VirtualBox Disk Image)
Click on “enter” on your keyboard to go further.
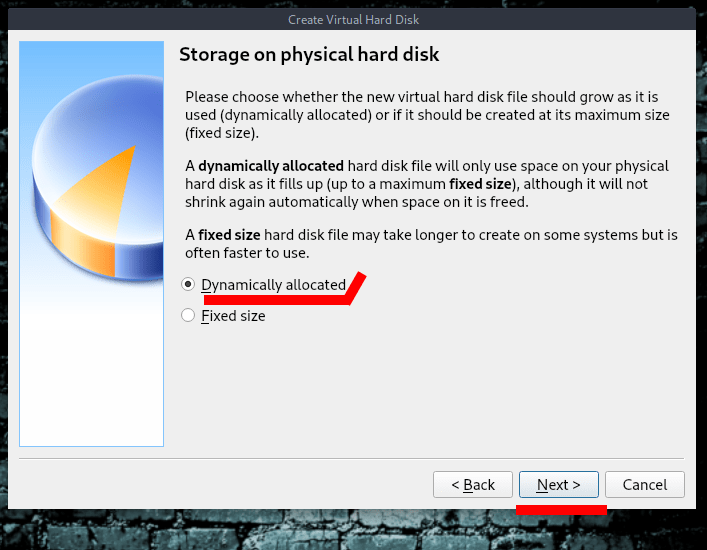
Storage on physical hard disk
The advantage of a dynamically allocated hard disk file is, that as the file gets larger because then it adapts to the size of the file.
“Next”
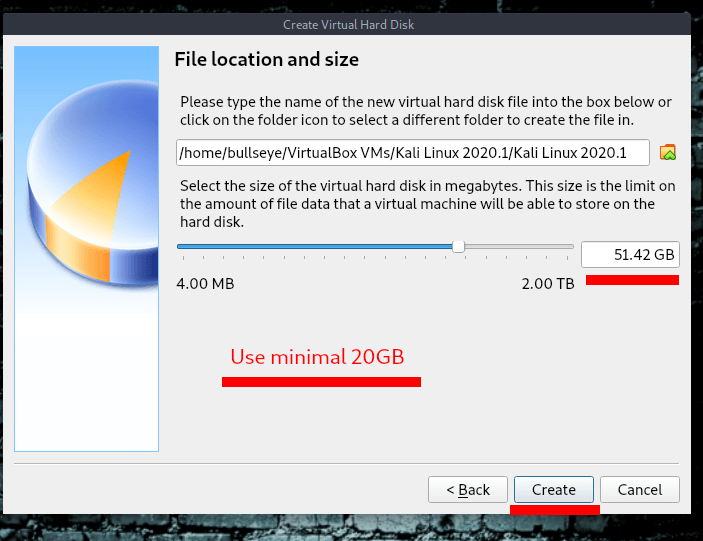
File location and size
For the install of Kali, you really need a minimal of 20 GB. In this example, I put the size to 50 GB +.
Click on “Create”
It is always good to take a generous amount of space. Better too much than too little, and you will get into trouble. Some tools or programs simply need space.
At the bottom of this article, you can watch a video of the entire Kali Linux installation.
Or click on this link to go to YouTube.
Now that the install on VirtualBox is ready so far, we are going to adjust some settings.
Click On “Settings”

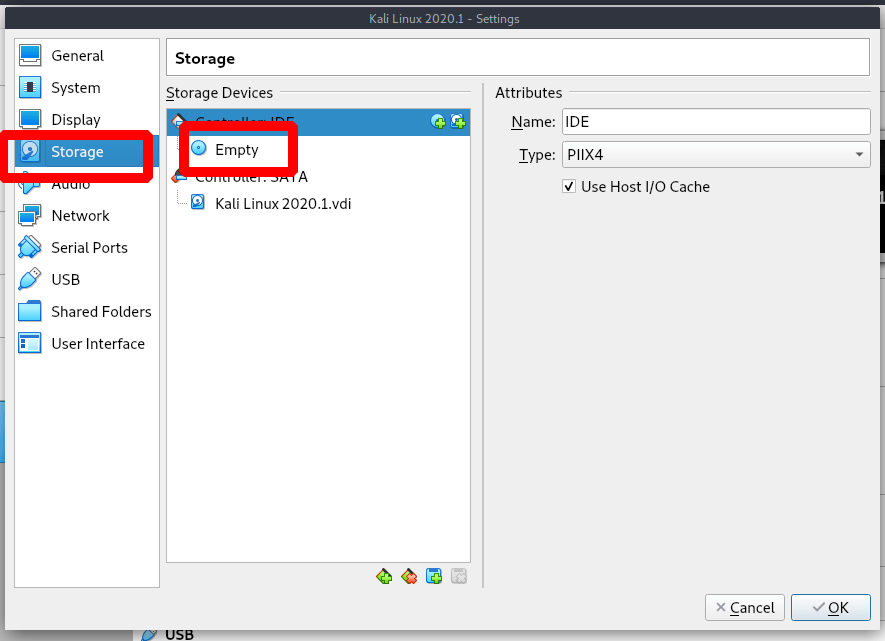
Storage
Click on storage - Empty
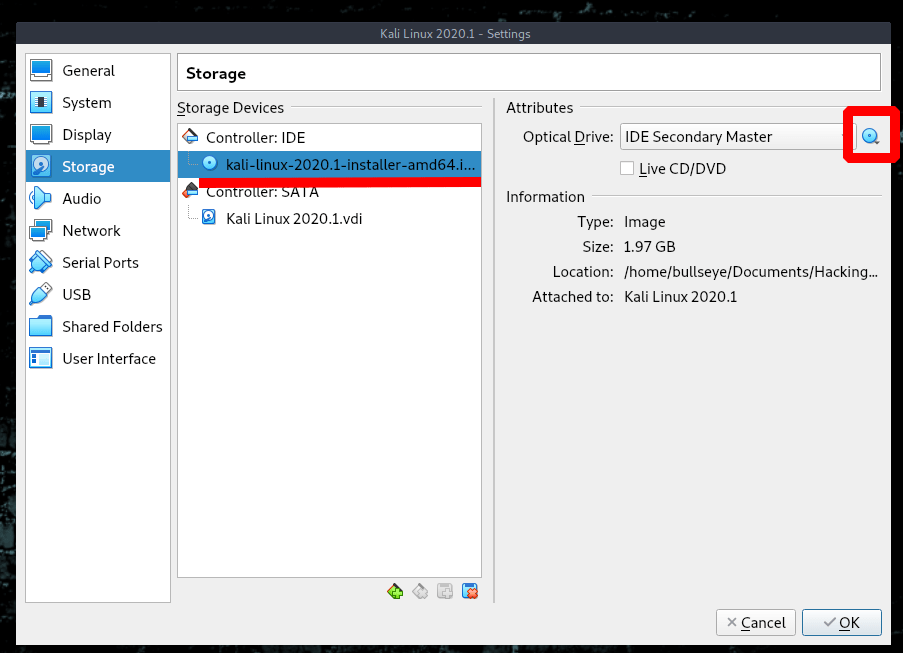
Choose a Disk File
To select On the Disk File, click on the box that I made red next to “Optical Drive”
Then choose the Kali Linux ISO that you just downloaded.
Network
Select Network and select “Enable Network Adapter” This is usually already checked.
Select Attached to: “Bridged Adapter”. Why… There is a very simple reason for this: the default network. … Because by selecting the Bridged Adapter, your guest operating system will work on the same network as does your host. And choose wlan0
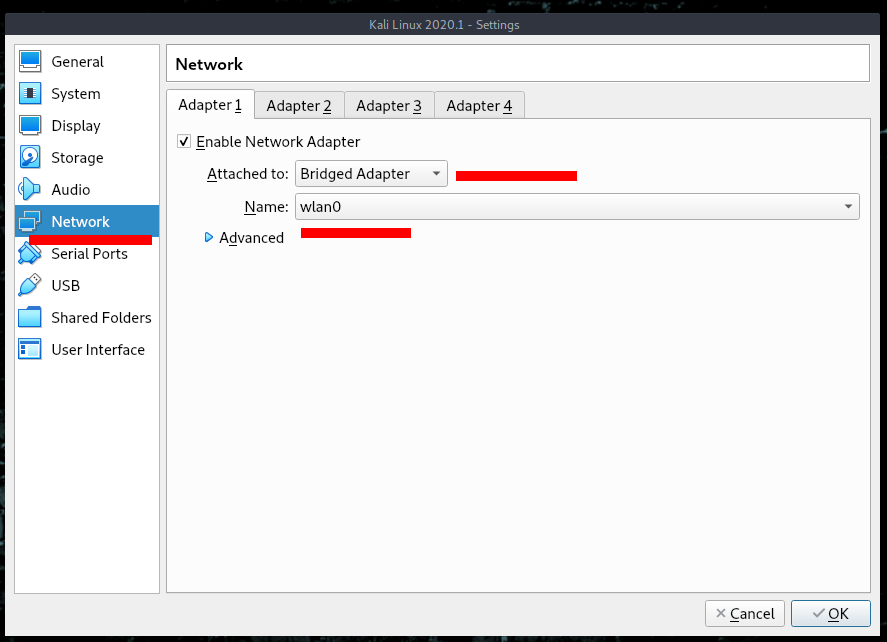
And click on “✓ OK”
There are many more options you can click and adjust. You should look for the best options for yourself.
The best thing about using a virtual environment is that you can and may make mistakes, because, you only learn from this. You just start again if it goes wrong.
Install Kali On VirtualBox
When you have adjusted all settings, it is time to install Kali Linux on your VirtualBox.
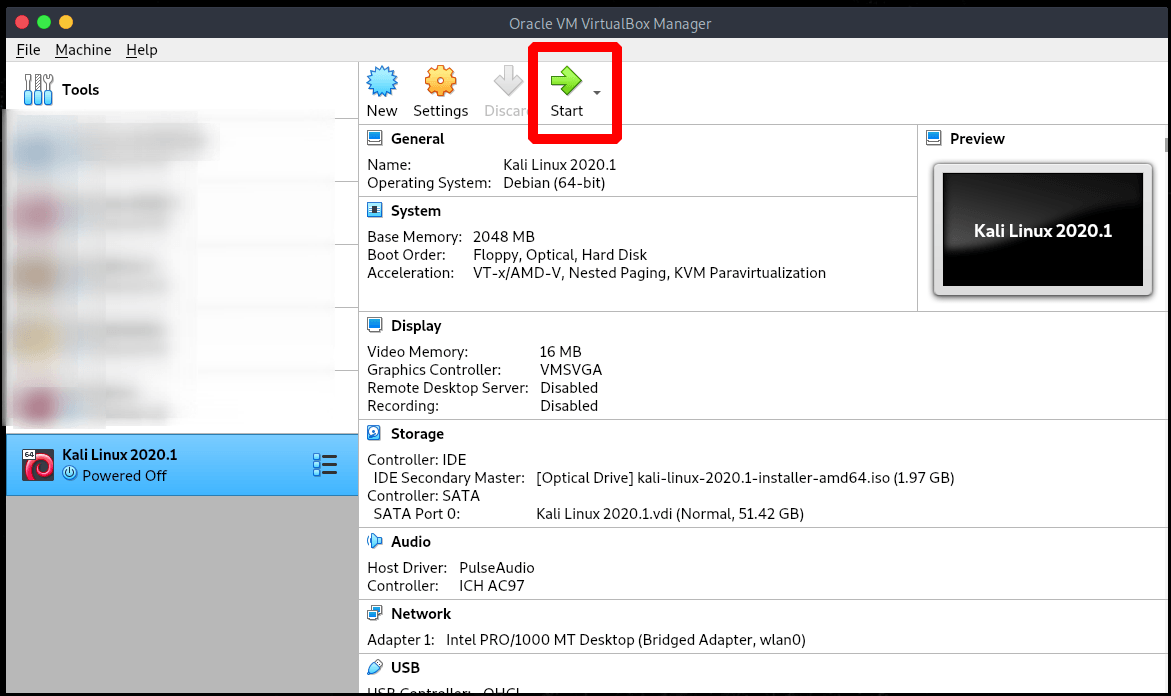
Select start-up disk
As soon as you have clicked on “Start” a new window will open. We will continue from here. Choose the correct ISO and click on “Start”

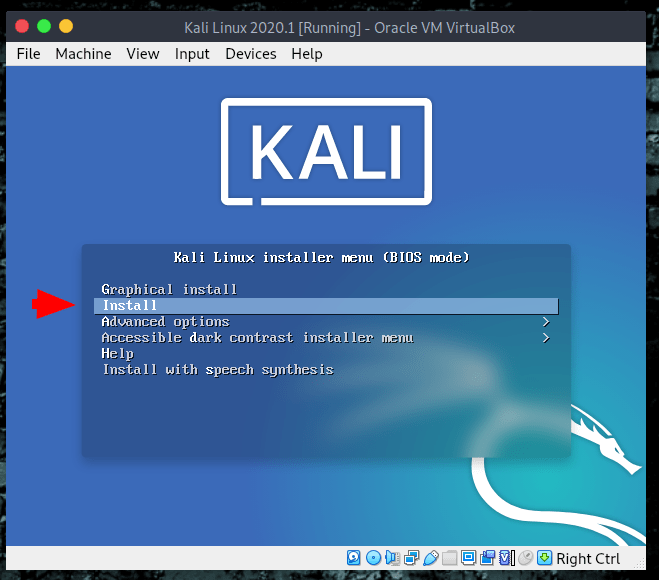
Select the correct installation
For this installation, I choose the regular “Install”, Instead of the Graphical install.
I will show both options in the Video. At the end of the video, you can see the graphical installation (in short).
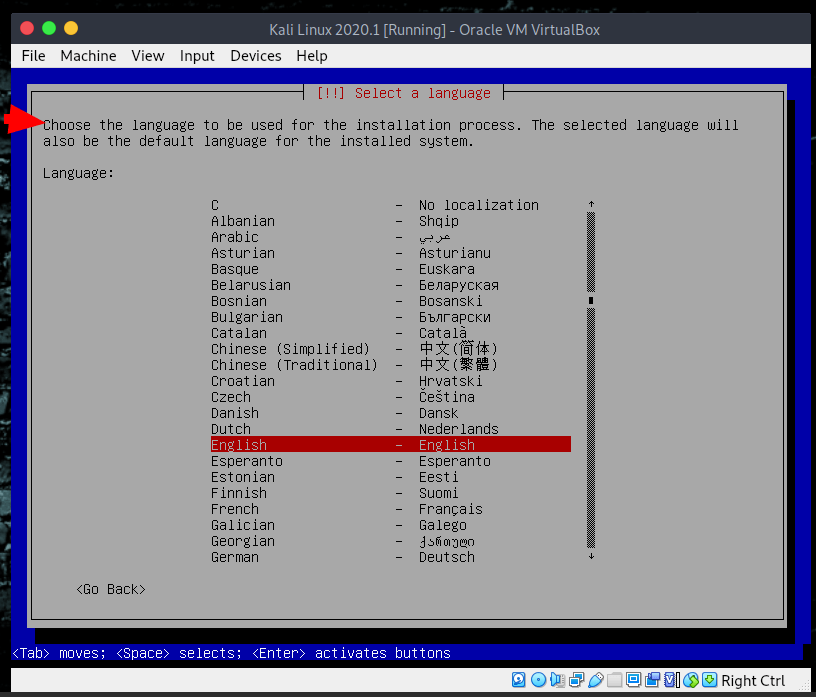
Choose the lanuage for the install process
We will of course do this in English :)
Select your location
Select your location. Click on “enter” on your keyboard to go further.

Configure the keyboard that you will use
Depending on the Language and region, you can choose your keyboard. For this install, I choose the default American - English.
Click on “enter” on your keyboard to go further.

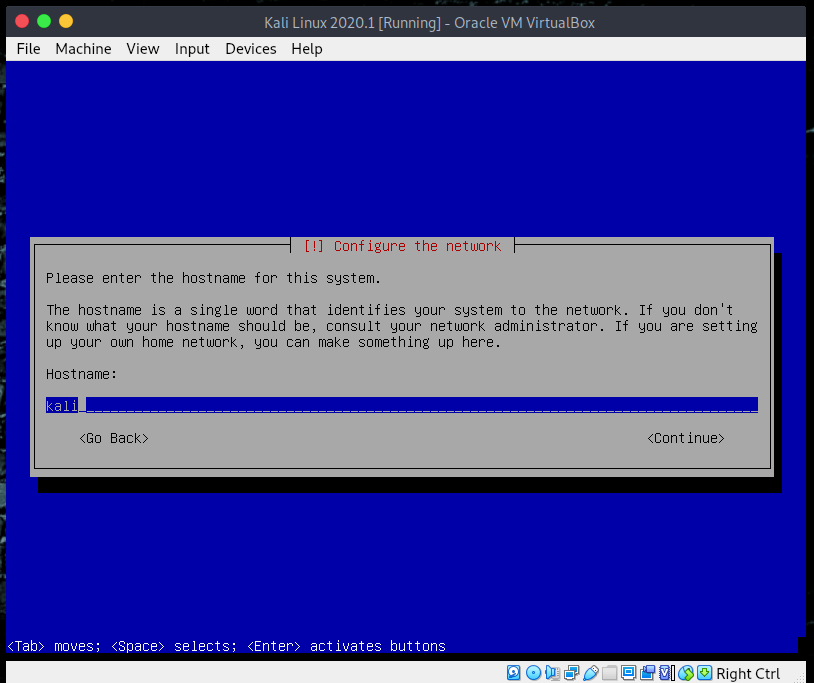
Choose a hostname for this system
As you can read on the screen, the hostname shows the identification from your system to your network. You can choose what you like. Click on “enter” on your keyboard to go further.
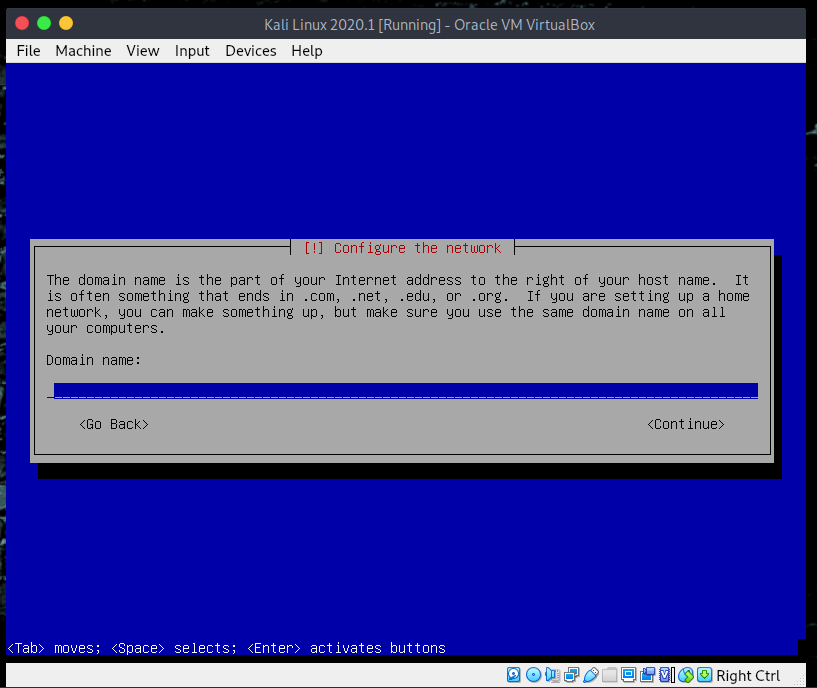
Choose your domain name
I leave this open. Click on “enter” on your keyboard to go further.
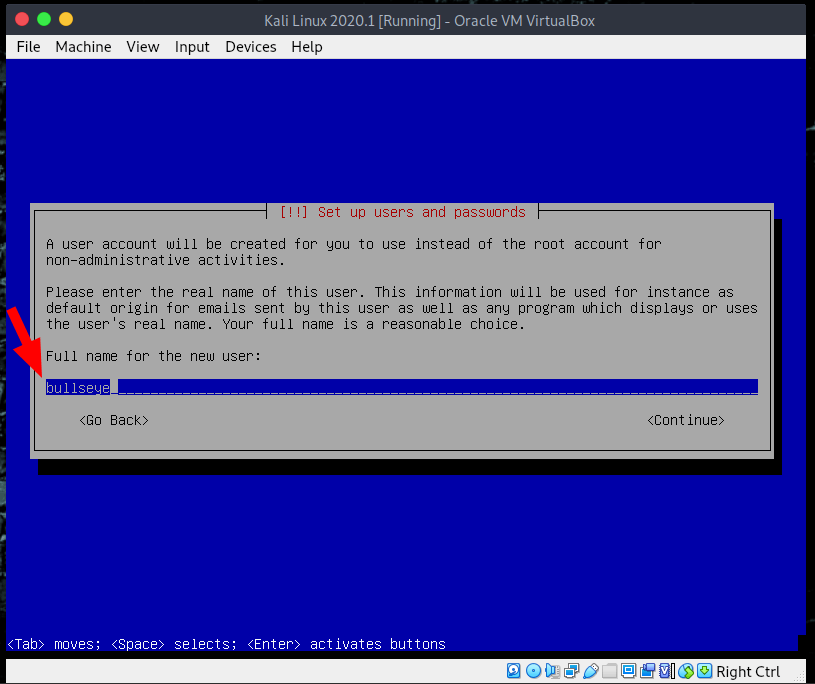
Setup user
Choose a user name. As you can read above, with the new Kali Linux the root user is no longer standard. Click on “enter”
“root/toor is dead. Long live kali/kali”
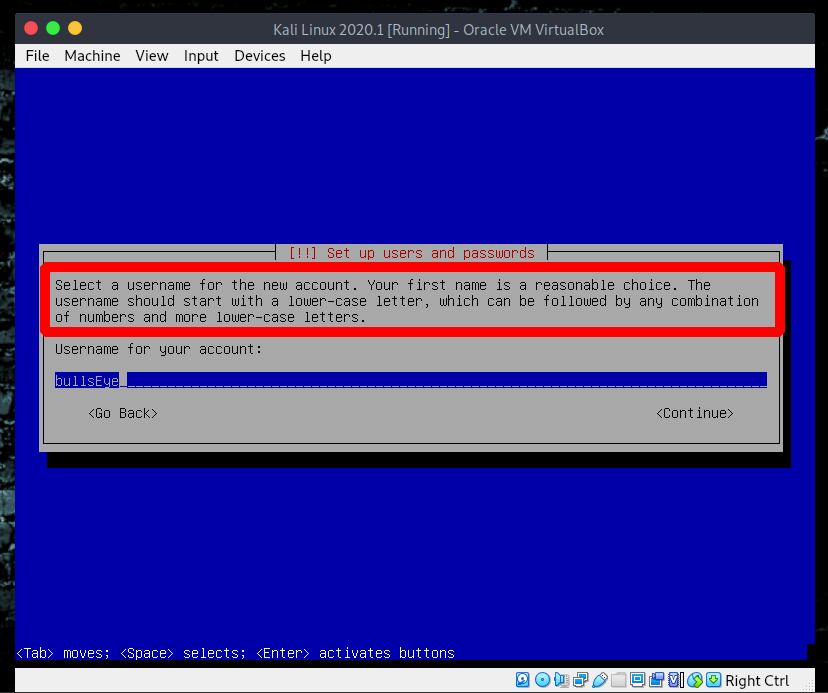
Usermame for the new account
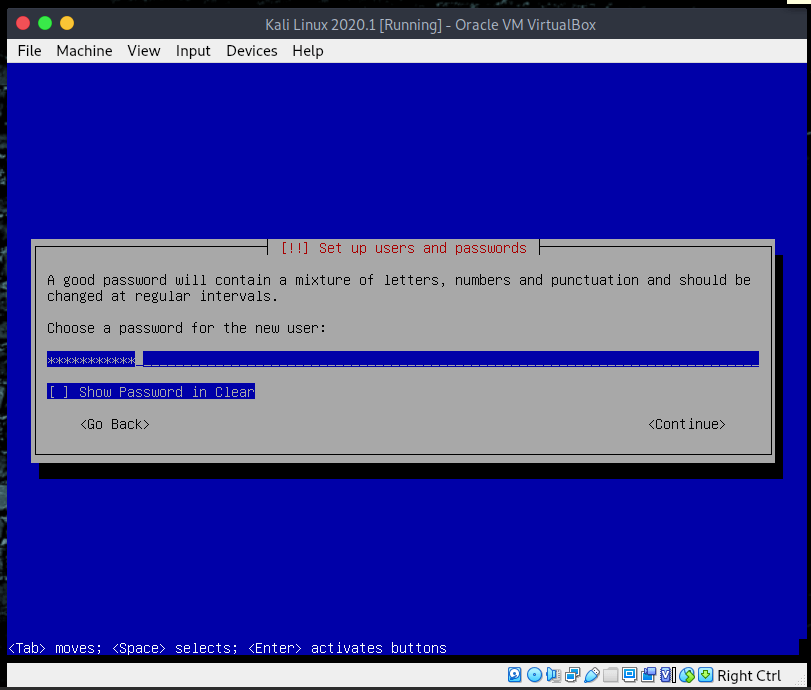
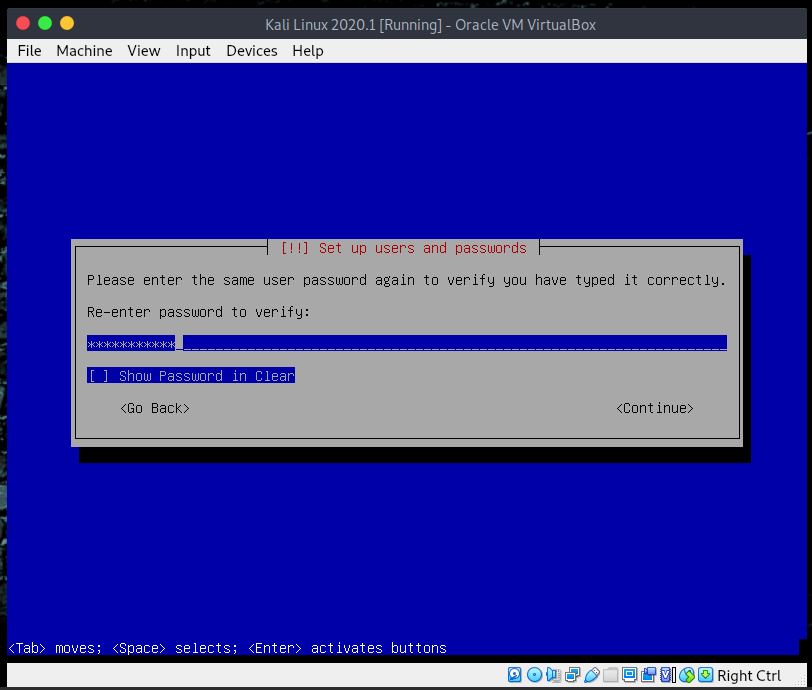
Choose a password for the new user
Re-enter the password to verify
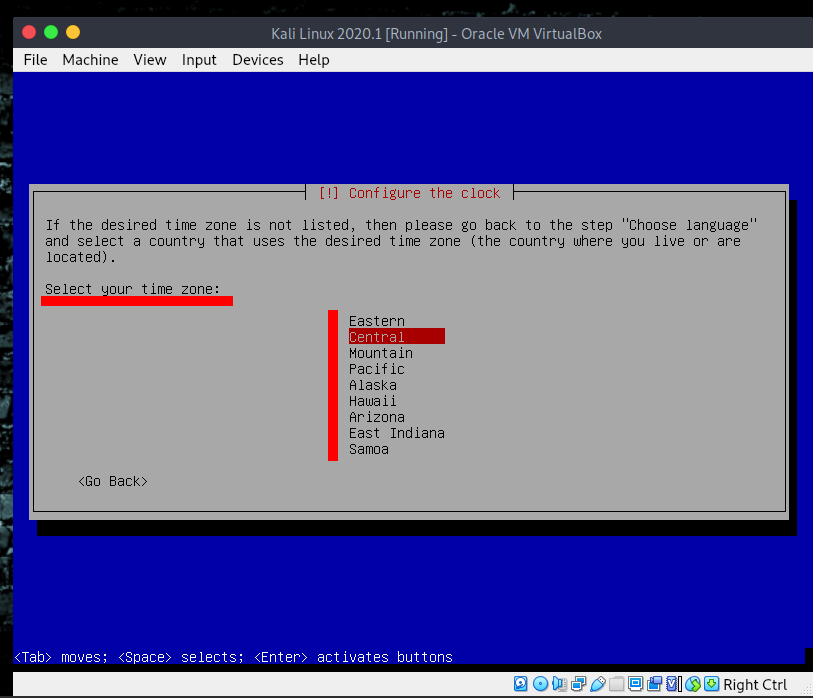
Select your time zone
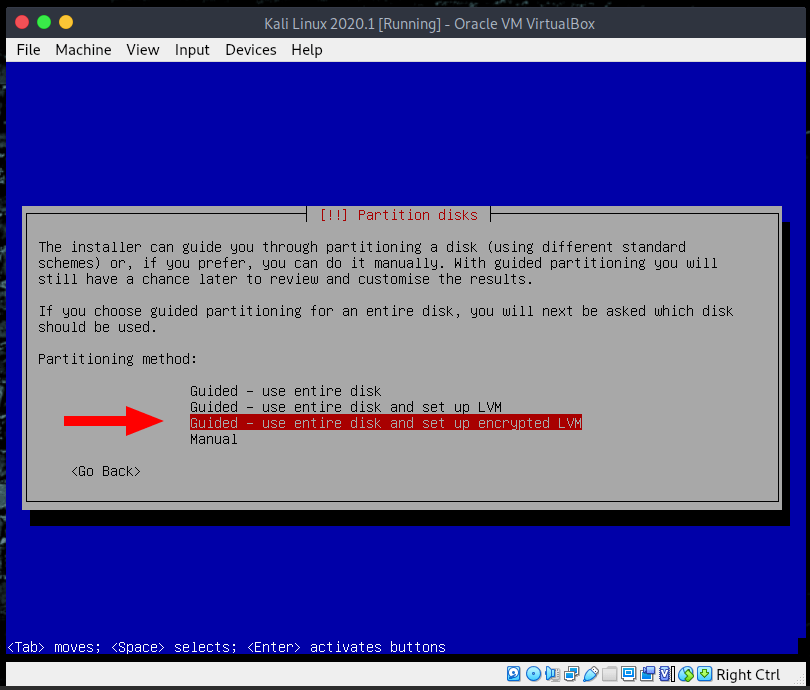
Partition disk
For this Kali Linux install we use the “Use entire disk and set up encrypted LVM” So that during the start-up of Kali you are prompted for a password … “We like to be safe” Then click “enter”
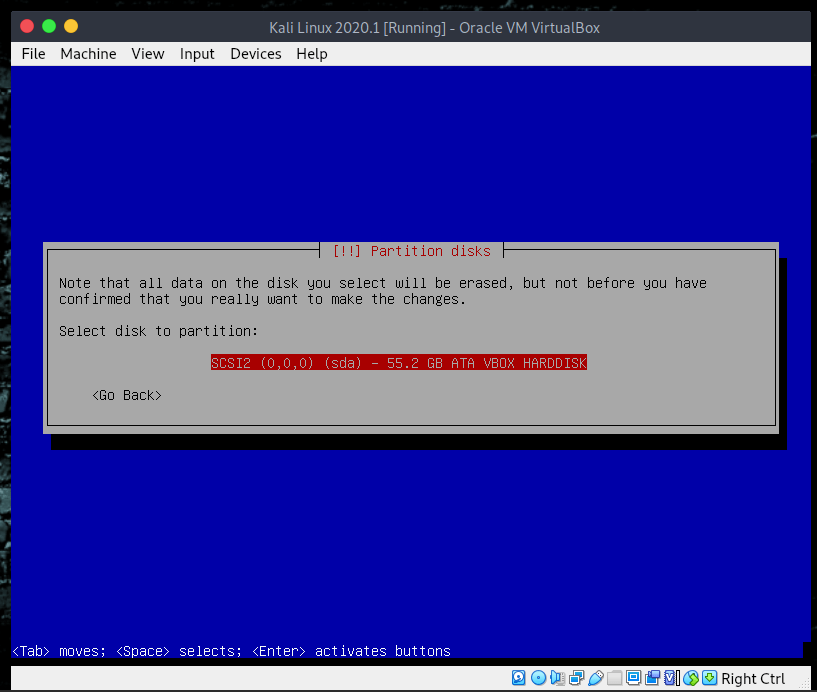
Select disk to partition
Choose the correct disk that you want to use. Nothing for me to do here so “enter”
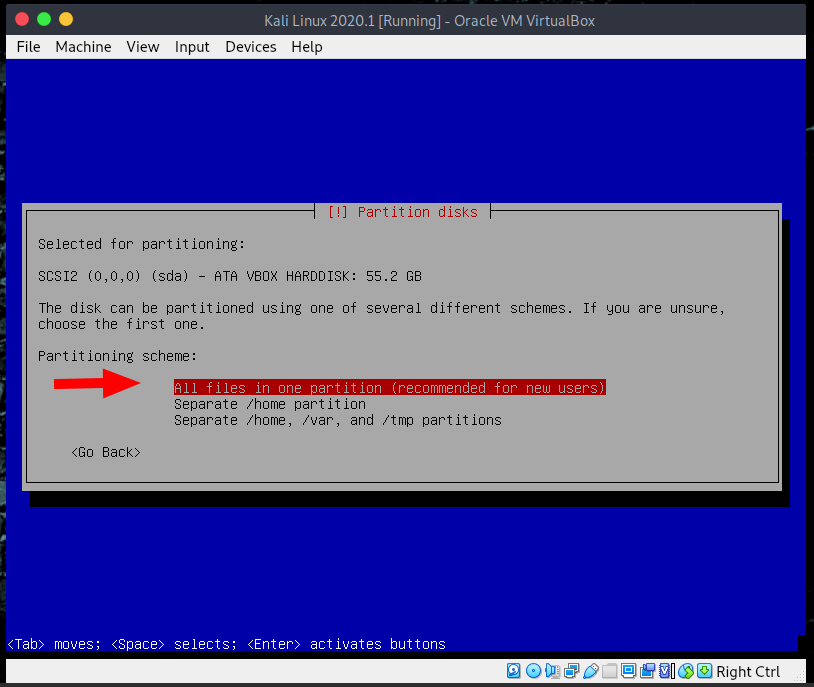
Partition scheme
Here we choose “All files in one partition, recommended for new users”. - “enter”
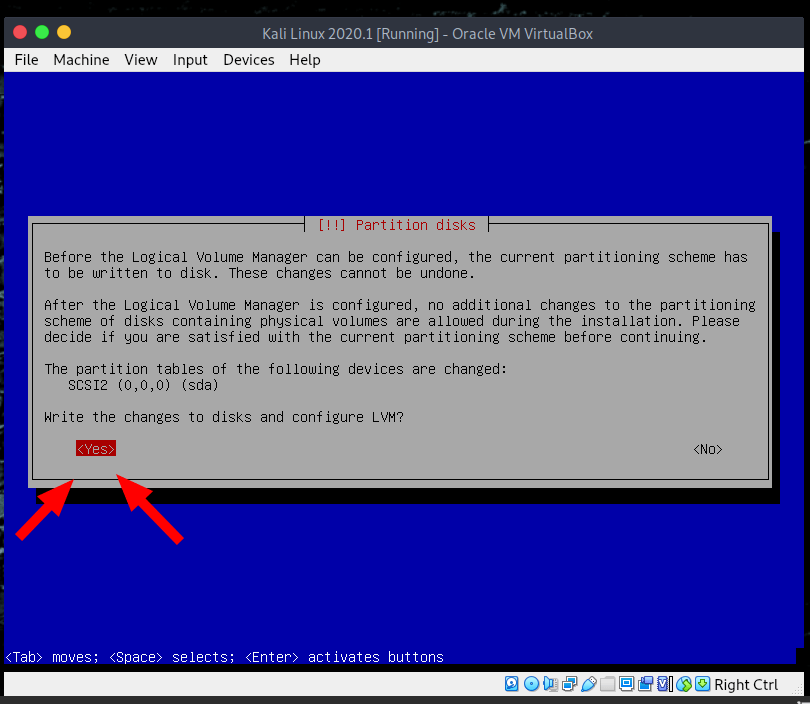
Write the changes to disk and configure LVM
Use the tab to jump to “Yes”.
Click on “enter”
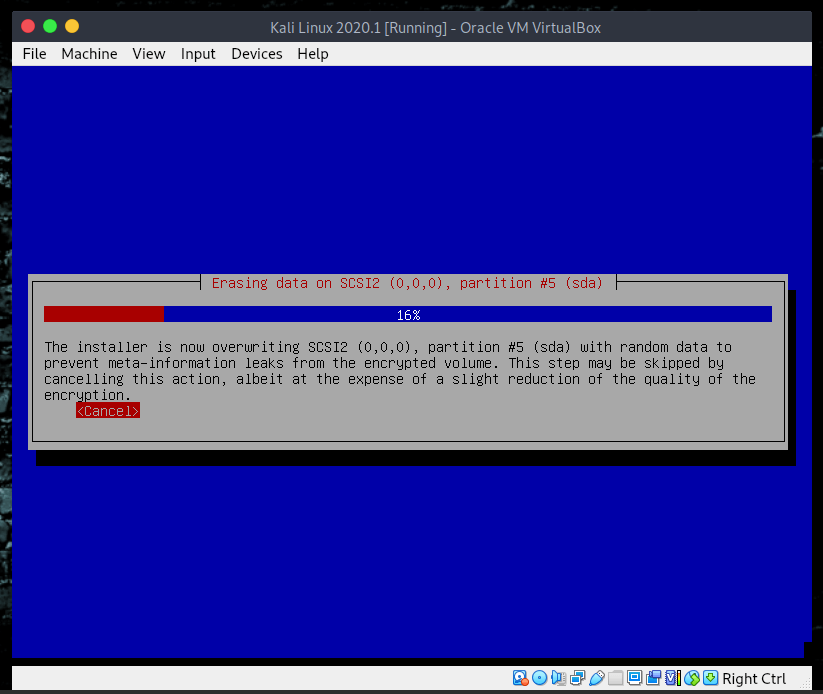
Eresing data
Take a coffee, because this will take some time.
“The installer is now overwriting SCS12 (0,0,0), partition (sda) with random data to prevent meta-information leaks from the encrypted volume. Canceling this action, albeit at the expense of a slight reduction of the quality of the encryption”
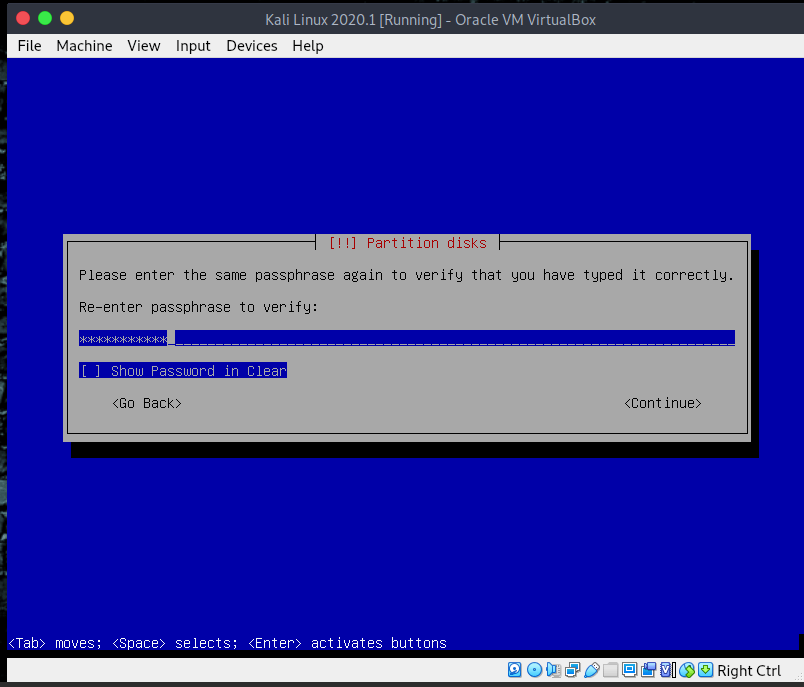
Encryption passphrase
This took a while for this installation.
Choose a password for the encryption and click on “enter”

Re-enter the password
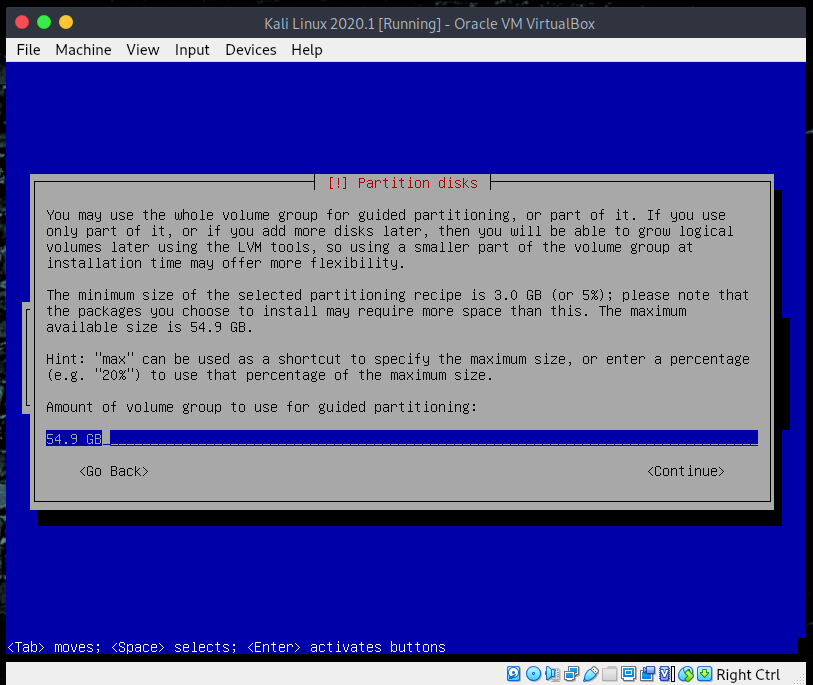
Amount of volume group to use for guided partitioning. In this example, I use all because this is a virtue environment. Click on “enter” on your keyboard to go further.
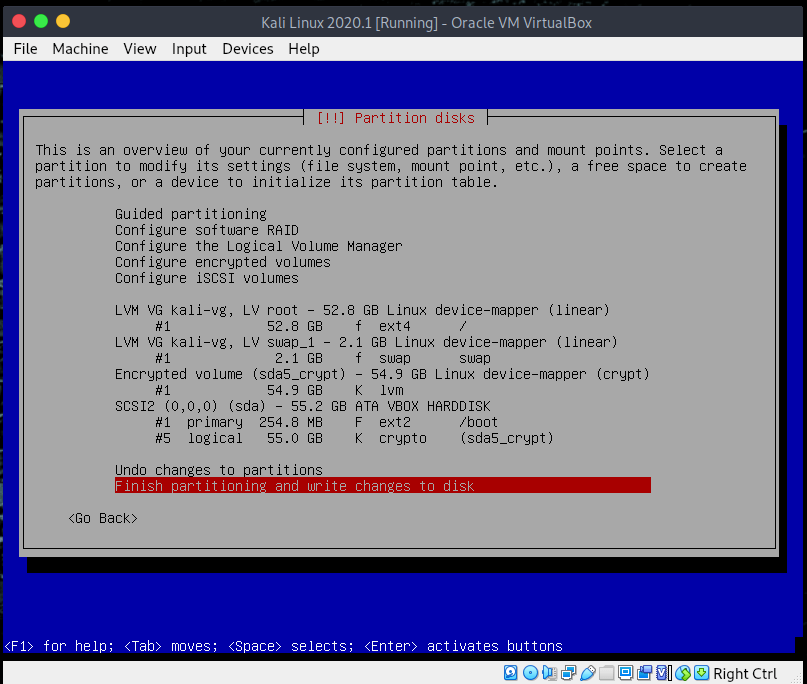
Overview configure partitions and mount points
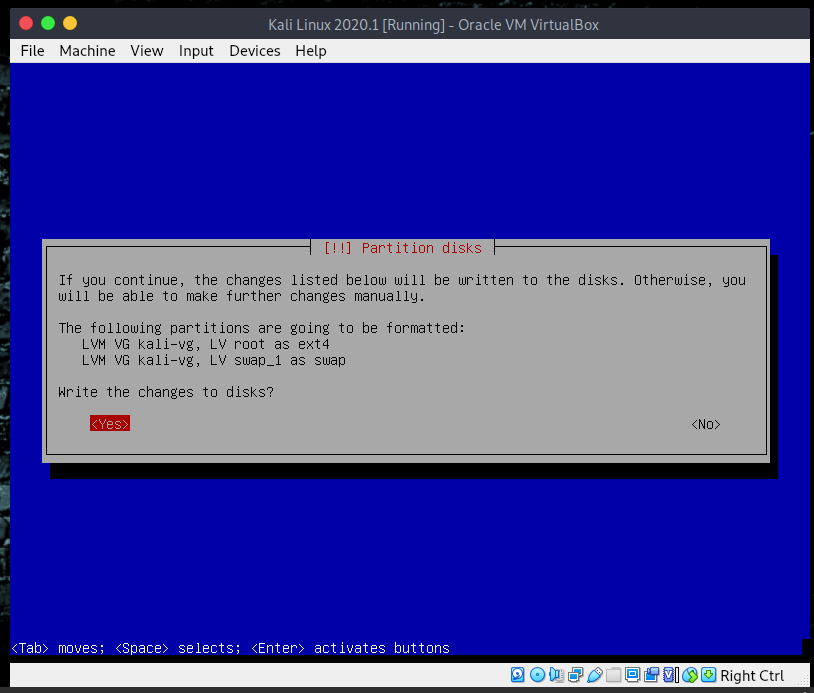
Write changes to disk
Use the tab to go to yes. Click on “enter” on your keyboard to go further.
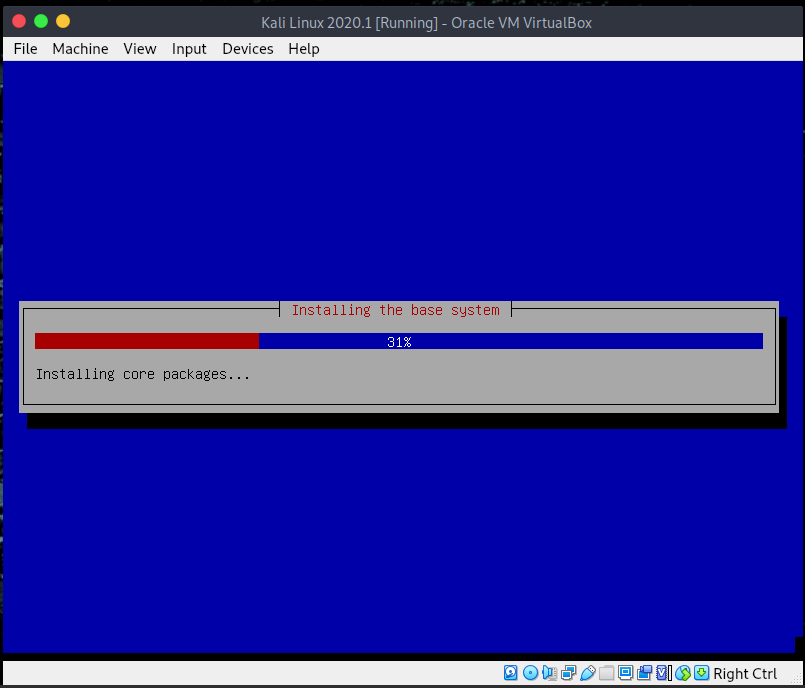
Install the base system
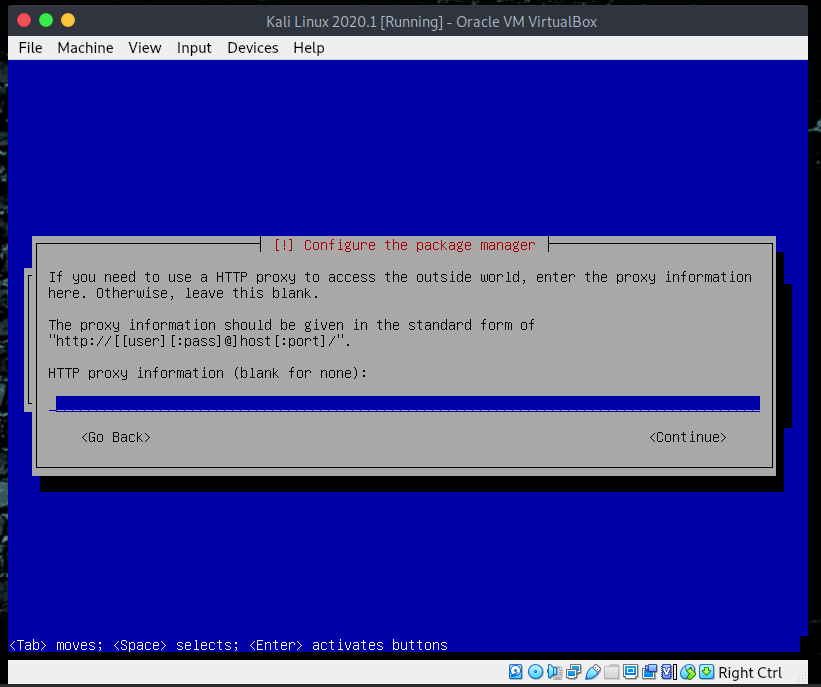
Configure the package
We don’t need an HTTP proxy, so we leave it empty. (blank). Click on “enter” on your keyboard to go further.
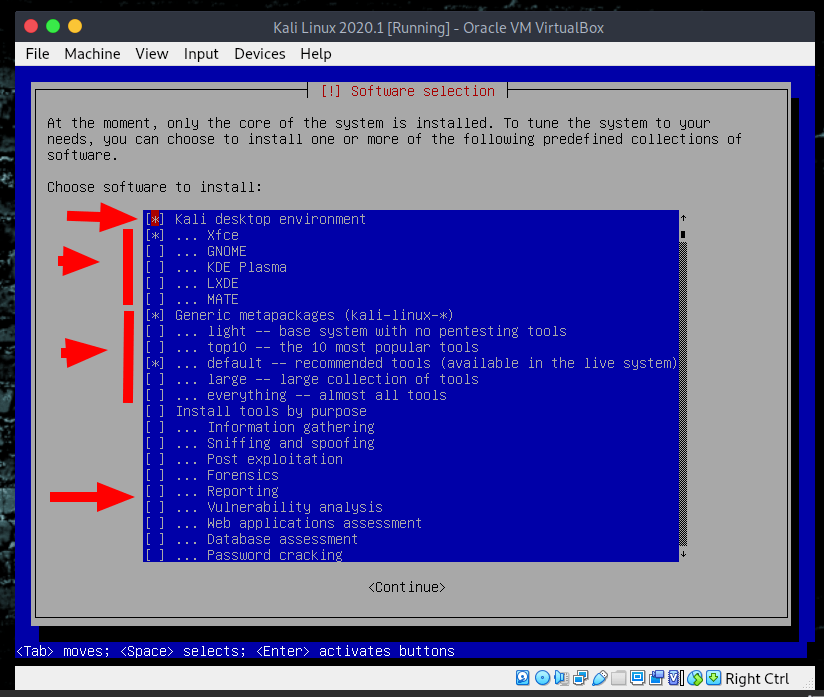
Choose software to Install
* Select all the options that you want to install for your Kali Linux installation
* Use the space bar to select the option. With the arrow on your keyboard for up or down.
* With this install I opted for:
* Kali desktop environment
* xfce
* Generic metapackages (kali-linux-*) I did installed the default. Enough choice for you.
✓ Standard system utilities (All the way at the bottom)
Click on “enter” on your keyboard to go further. This takes some time to install. Grab yourself a coffee.
Use the space bar to check the options that you want to choose
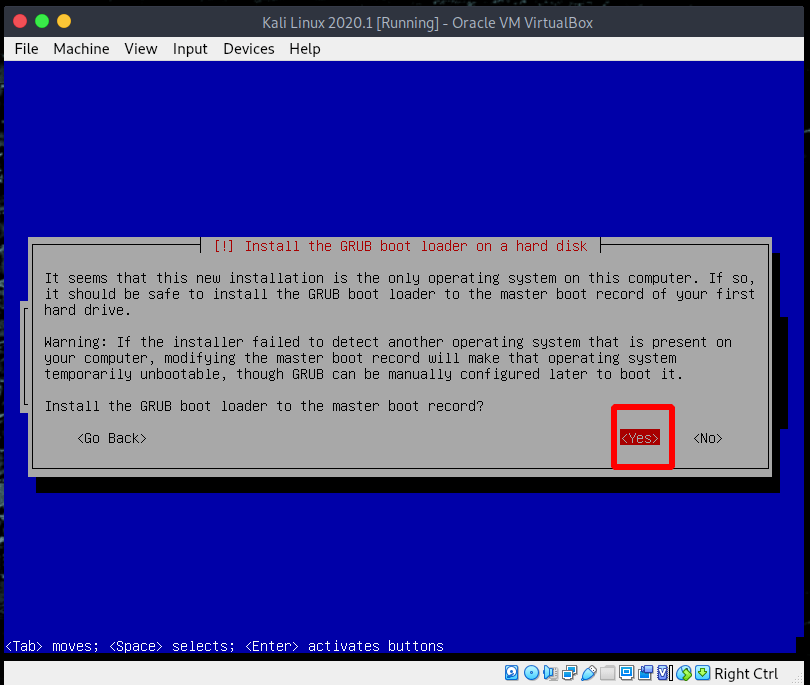
The GRUB boot loader
We certainly want to install the GRUB boot loader, so choose <Yes> Click on “enter” on your keyboard to go further.
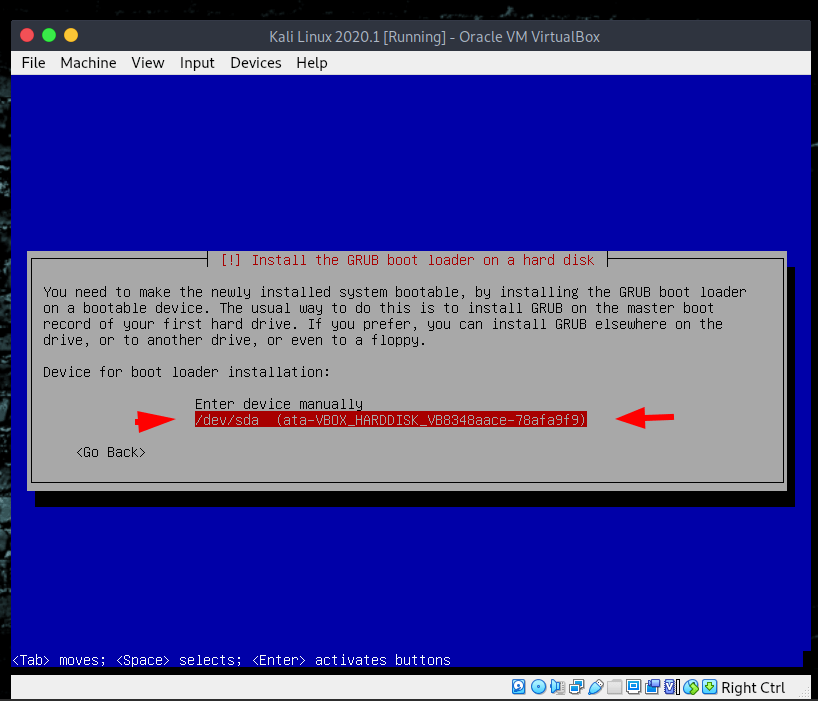
Device for bootloader installation
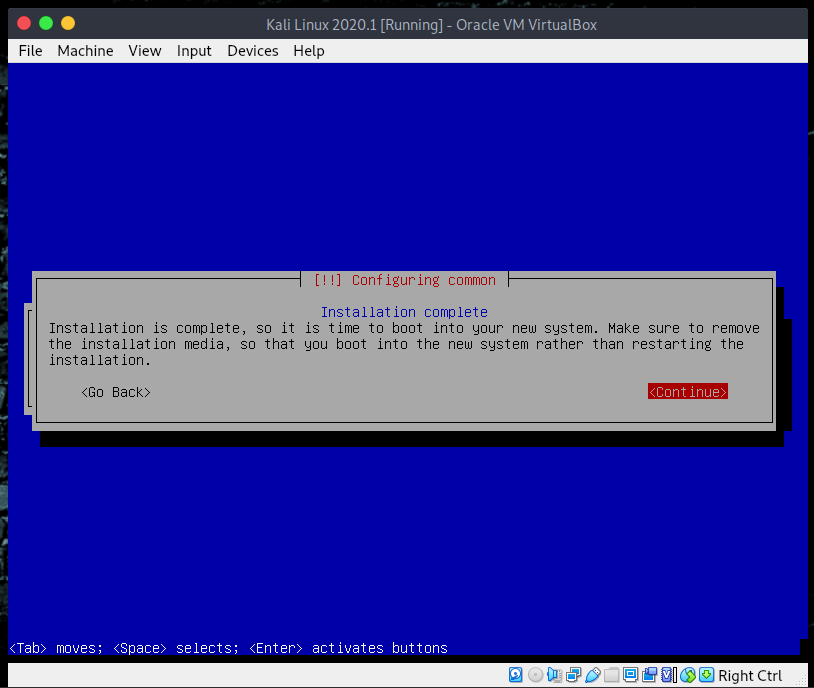
Installation is complete, time to boot your system
Finally, the install of the Kali Linux install is complete. Press “enter” for a reboot.
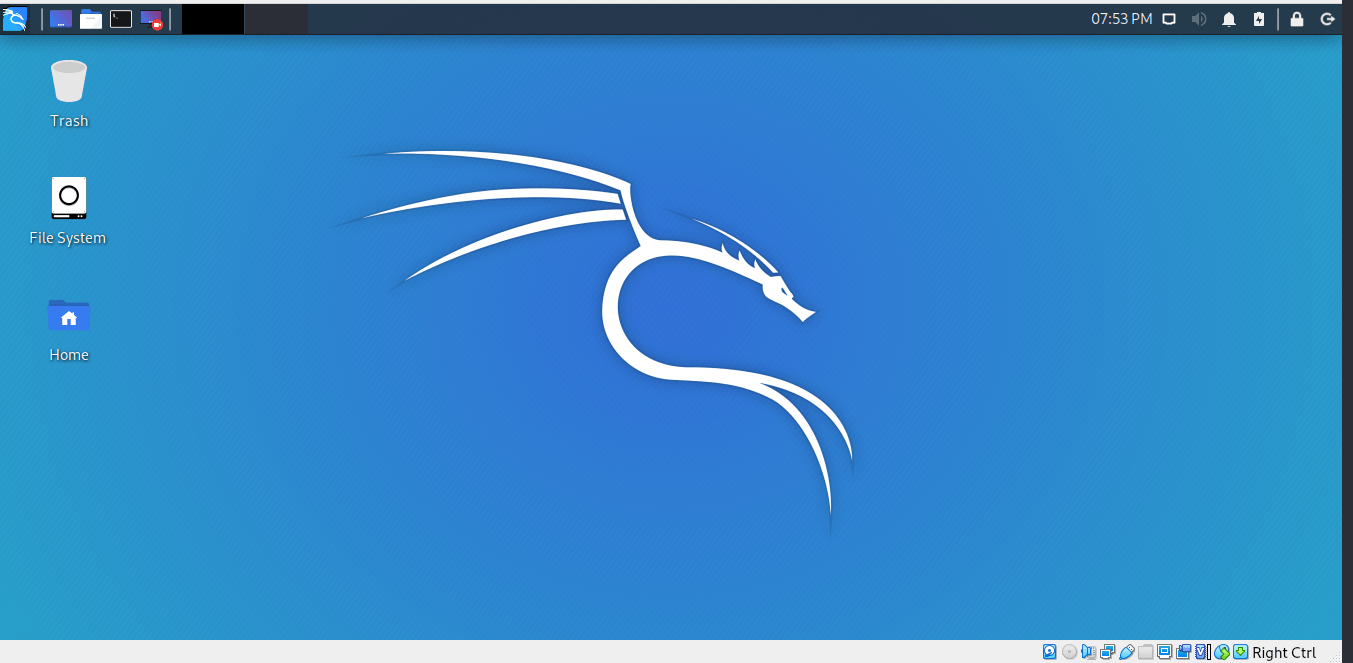
Kali after the install
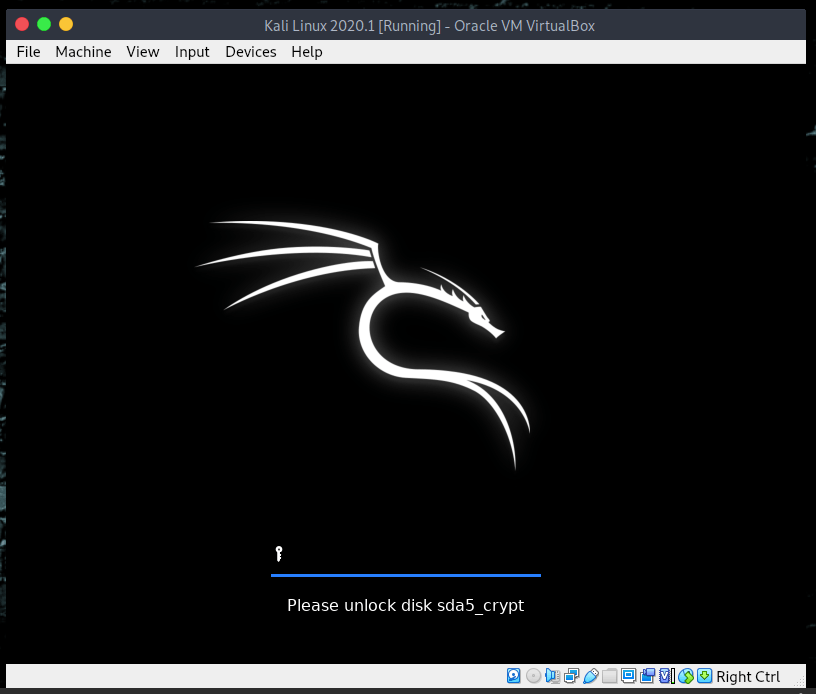
Unlock disk
You have your file encrypted because of more security. Use your password to unlock the disk.
Enter your user name and password
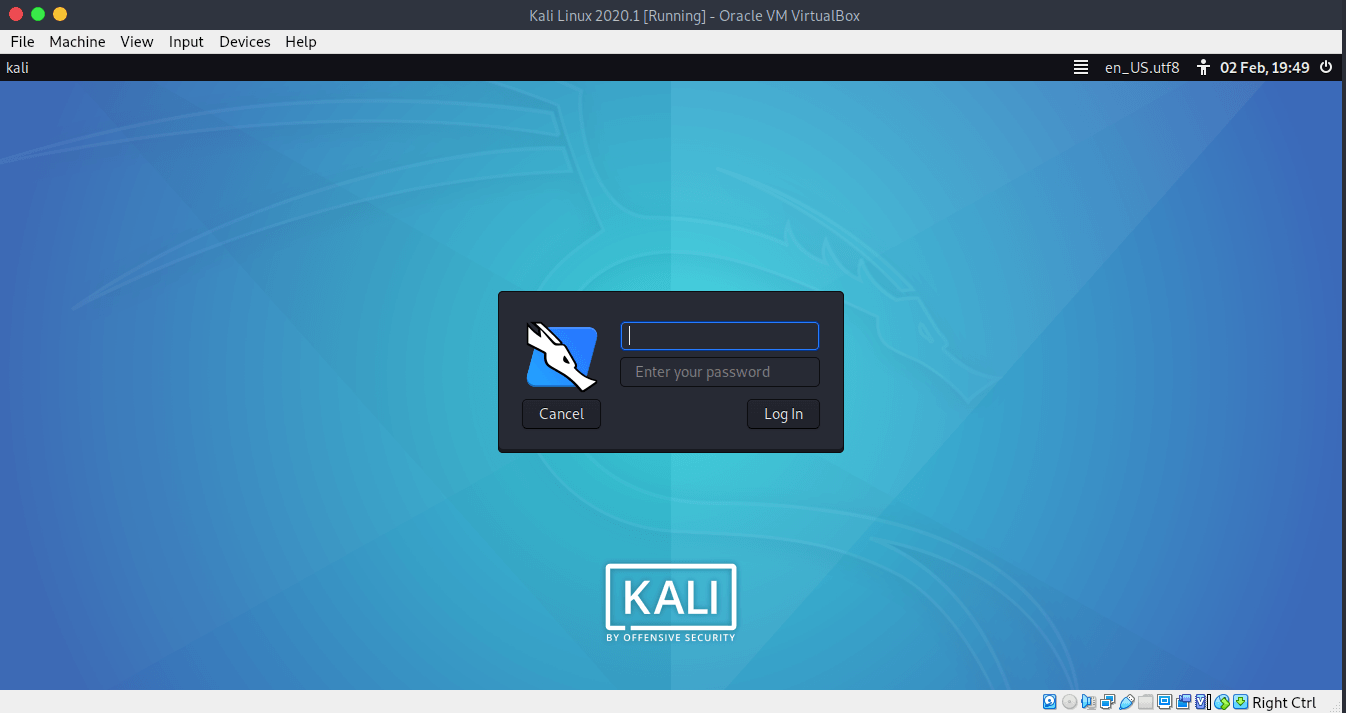
Finally, the Kali Linux installation is successful.
A nice article to continue reading. “Best Linux Commands Hacks and other Cool Tricks for Beginners”
At the bottom of this article, you can watch a video of the entire Kali Linux installation.
Or click on this link to go to the video on YouTube.
Single Boot Kali
Installing Kali Linux on your computer is an easy process. First of all, you’ll need compatible computer hardware. Kali is supported on i386, amd64, and ARM (both armel and armhf) platforms. The hardware requirements are minimal as listed below, although better hardware will naturally provide better performance. The i386 images have a default PAE kernel, so you can run them on systems with over 4GB of RAM. Download Kali Linux and either burn the ISO to DVD or prepare a USB stick with Kali Linux Live as the installation medium. If you do not have a DVD drive or USB port on your computer, check out the Kali Linux Network Install.
Installation Prerequisites
- A minimum of 20 GB disk space for the Kali Linux install.
- RAM for i386 and amd64 architectures, minimum: 1GB, Recommended: 2GB or more.
- CD-DVD Drive / USB boot support
Preparing for the Installation
- Download Kali Linux.
- Burn The Kali Linux ISO to DVD or Image Kali Linux Live to USB.
- Ensure that your computer is set to boot from CD / USB in your BIOS.
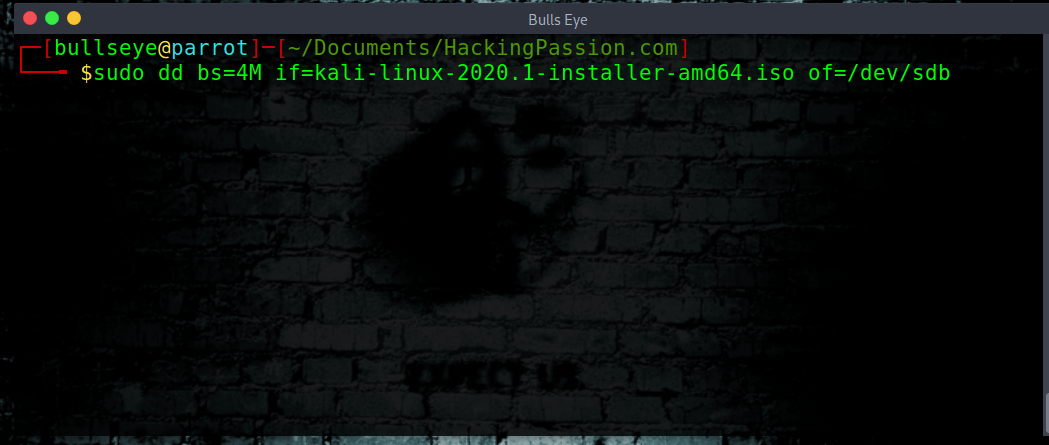
Install the ISO to USB Linux command line
Put your USB stick in your computer and give the command “fdisk -l” to “List the partition tables for the specified devices and then exit”
| |
Make sure the USB is unmouted:
| |
Use the command below to write your ISO to your USB
| |
Video
In this video, I show you how to install Kali Linux on a “normal Install” Because, the install of Kali Linux is a long process, I shortened the video a bit. At 17.20 minutes in the video, the graphical install starts.
Become a member on Odysee.com
Earning on Odysee for watching videos ♥️
Here an invitation link, so that we both benefit.
In this way, you also support my work.
https://odysee.com/$/invite/@hackingpassion:9
Conclusion
The latest Kali Linux 2020.1 install has really surprised me because it offers an impressively rich set of tools for almost every phase of the penetration testing process, the final choice of tools to use will always depend on the tasks and goals of your current project. What for many “hackers”, pen-testers and cybersecurity engineers should be added on Kali are a number of programming options because (some) hackers like to program.
Just remember, Performing any hacks without written permission is illegal ..! Read also the Disclaimer..!
WANT TO SUPPORT THE WEBSITE
Dear people, I do a lot of things on the Internet and I do it all for free. If I don’t get enough to support myself, it becomes very difficult to maintain my web presence, which takes a lot of time, and the server costs also have to be paid. Your support is greatly appreciated.
Thanks guys ..!
https://paypal.me/hackingpassion
Use the link above to donate via PayPal.
IMPORTANT THINGS TO REMEMBER
✓ This Video and Article is made for educational purposes and pentest only.
✓ You will not misuse the information to gain unauthorized access.
✓ This information shall only be used to expand knowledge and not for causing malicious or damaging attacks…!
Read also the Disclaimer
All the techniques provided in the tutorials on HackingPassion.com, are meant for educational purposes only.
If you are using any of those techniques for illegal purposes, HackingPassion.com can’t be held responsible for possible lawful consequences.
My goal is to educate people and increase awareness by exposing methods used by real black-hat hackers and show how to secure systems from these hackers.
Stay updated
Get the latest posts in your inbox every week. Ethical hacking, security news, tutorials, and everything that catches my attention. If that sounds useful, drop your email below.